Animating 'A Girl With A Mirror' - Week 4&5 (tri2)
- Julia Toczyska
- Mar 21, 2024
- 5 min read

Updated: Apr 9, 2024
The process of animating 'A girl with a mirror, an allegory of Profane Love' by Paulus Moreelse.
Museum Visit
Before diving into the animation itself, me and my project partner Betty decided that it would be best if we went to see the painting in person. It was hard to locate the piece inside of the Fitzwilliam museum, but once we did I instantly knew that we chose the perfect painting for our vision. Additionally, the beautiful frame of the painting featured in the museum adds an additional level of touch and beauty. I took multiple pictures of the painting during our visit as I believe I will be incorporating them into the animation.


Photoshop
Betty was the one to work on the first part of the animation. We wanted to create hand movements that would point at the mirror, almost as if she wants to show the viewer how she looks. Initially, Betty was going to animate in photoshop but later changed her mind to use Adobe Animated instead. Regardless, we still used photoshop to separate all the layers necessary for animation.

Additionally, Betty also used photoshop to make the background by using the lassos tool to select areas copy and pasting them where she needed them to go. She also used colour swatches to certain areas and painted over them to remove the arm from the background so it perfectly separated from the picture.

Adobe Animated
After that, it was transferring all the pieces to Animate and moving them. Betty separated every part that would move into different layers. There is the eyelids, arm cover, hand, forearm, and background layers. The arm cover and background was locked so they wouldn’t move at all while she was adjusting the hand, forearm, and eyelids. Betty made the arm move up and down along with a wrist flick to bring more attention to the mirror that she’s pointing at.

Next, Betty made a variety of eyelid positions in the photoshop file and transferred them to the animate file. After that it was simply just copy and paste each keyframe of each position to get her to blink and wink. From there it was time to move on to my part with Aftereffect.
Adobe After Effects
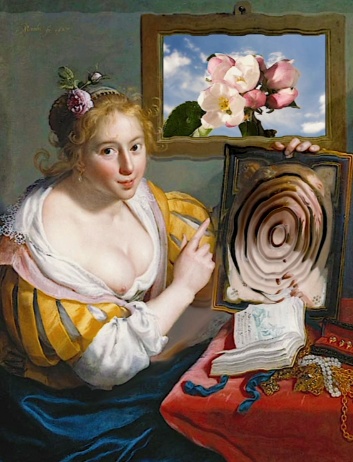
Now let's address the most frustrating part of the animation... the water effect. We knew we wanted to create this illusion making the mirror appear almost magical. This is both for aesthetical and practical reasons, as it would hide the reflection of the hand that is not animated.
For this part of the animation I have decided to use Adobe After Effects since I have very little experience with it and I thought it would be a nice way of challenging myself - well that was probably the main source of my problems. The idea was to apply an effect onto the mirror, making it appear watery and mysterious. To achieve this I have decided to follow a video tutorial which explained to me how the warp, distortion works in After Effects.
Following the tutorial, I have created a new composition and used the 'radio waves' effects to achieve the look I was going for. I have adjusted the waves motion through the frequency, expansion, lifespan settings, and distorted the shape of the wave to fit into the mirror frame.

Unfortunately I ran into a lot of problems, one of them being the absolute abomination I have created in the video below. I found myself struggling to understand what I did wrong on multiple occasions. Sometimes everything would work perfectly but once I put the prepared wave animation onto the lady everything would seem to corrupt. Eventually, I got everything working but I must admit it was a bit frustrating. I am happy with how the effect turned out although a part of me still wants to improve. I definitely want to explore more of After Effects in the future.
Adobe Premiere Pro
Diving into Premiere Pro, I knew I wanted to add camera movements that were meant to guide viewers along the painting. However, before that I had to address certain parts of the animation that I felt were missing.
I have decided to start off with animating the frame in the background. Initially, we wanted to include other paintings by Paulus Moreelse - in a way representing his work as a whole, however, we came to the conclusion that by doing so we would stray away from the message this painting conveys. In the end we have decided to replace the frame with a time laps of a flower blooming. I believe the blooming flower could represent the coming of age story of this piece. Then, I have asked Betty to separate the frame from the image similarly to how she separated the girls hand in Photoshop prior. As she did that, I have simply scaled the video onto the frame and put a new border on top of it to blend it in.
Next, I have addressed a simple issue I had with the quality of the image through adding a distortion effect on top of the whole video - I believe it turned out to be a nice touch, especially with how it distorts the girls face, making it go between expressions of sadness and happiness. In a way it ties in with the emotions we feel growing up, the fears and excitements that come with it.


Then, I have moved on to other details, such as adjusting the colour correction. I felt like the image we used to animate felt dull in comparison to the painting we saw during our visit at the Fitzwilliam museum. I have adjusted the vibrancy of the video, making it appear more lively.
Afterwards, I have decided to export the animation, and start a new project. Thinking back to the exhibition, I have decided to add a beautiful touch that was missing from our work - the extremely detailed frame we saw at the museum. I took one of the photos I had from our trip, and put the exported video on top of the image, resizing it to fit in the frame. Looking back, I wish we have separated the frame from the image just like we did previously as it would help the video to transition better onto the frame.

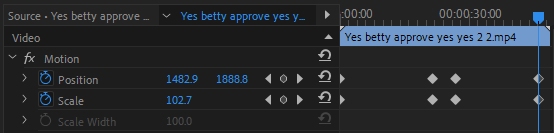
Lastly, I finally got to making the camera movements. I have decided to start the timeline from the close up of the girls face, slowly moving to the her table, before zooming out to the full frame. I have used the motion feature to achieve this, using the clocks and creating the frame position on the timeline.
Evaluation
Here's the final animation uploaded onto YouTube. Overall, I am extremely satisfied with how it turned out. I do have little complains, such as the quality of the painting and the mirror animation. If I could go back in time I would have upscaled the image before we started animating, but in a way, I am glad we didn't do that because it led me to discovering the distortion effect. When it comes to the mirror, I am not that upset over it - maybe I could've made the effect bigger and put it behind it's frame? But on the other end I do enjoy the way it seeps out of the frame as it adds to that mysterious feel I wanted to achieve. Either way, I believe I have managed to come out of my comfort zone during this project, and I am really glad I did.


Comments